


方案详情
文
本文章详细介绍了饮用水中氨氮的测定,包括校准液、水样的准备,校准和测量过程,以及电极和仪表的维护等内容。
方案详情

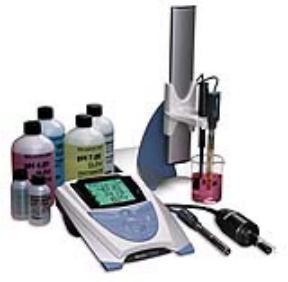
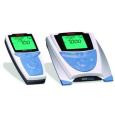
Ammonia inDrinking Water Star SeriesMethod Note M-1001-E03/05 RevB Ammonia inDrinking Water Calibration and Analysis ·Ammonia Introduction 1. Allow all the standards and the samples to attain room temperature for precise measurements since themeasurement is temperature sensitive. 2.C(alibrate the meter using the 0.1 ppm, 1.0 ppm, and 10 ppm standards, stirring the standards at auniform rate. ·Drinking Water·lon SelectiveElectrode (ISE) The direct concentration ammonia method requires no titration and has no turbidity or color interferences.This method is approved by both the EPA and ASTM and is a very time efficient method requiring only aminute or two per sample. The Orion° 9512BNWP gas-sensing electrode allows fast, simple, economicaland accurate measurements of dissolved ammonia in aqueous solutions. 3.Place the electrode and stirrer into the beaker with the 0.1 ppm standard such that the electrode tip isfully immersed in the solution. The stirrer should be positioned slightly below the tip of the electrode.Press the STIRRER key on the meter to turn the stirrer on. Press the CALIBRATE key. Recommended Equipment Catalog# 1. 4 Star benchtop pH/ISE meter 1115000 4.Wait for a stable reading (1-2 minutes). Enter standard value of“0.10”using UP and DOWN arrowkeys and the DECIMAL/DIGIT key. 2. Ammonia electrode 9512BNWP 5. Press the CALIBRATE key to accept the 0.10 ppm standard and press the STIRRER key to turn thestirrer off. 3. Orion benchtop stirrer (or magnetic stir plate and bar) 096019 6.Rinse electrode and stirrer thoroughly with deionized water. Gently remove excess solution from theouter sleeve of the electrode by dabbing with a clean paper tissue. .7.Place the probe and stirrer into the beaker with the 1 ppm standard such that the electrode tip is fullyimmersed in the solution. The stirrer should be positioned slightly below the tip of the electrode.Press the STIRRER key on the meter to turn the stirrer on. 4. Benchtop electrode stand 1110001 5. Beakers (150mL) Volumetric flask (100 mL) 7. Pipette (10 mL) 8.Wait for stable reading (1-2 minutes). Enter standard value of“1.00”using UP and DOWN arrowkeys and the DECIMAL/DIGIT key. Required Solutions Catalog # 9.Press the CALIBRATE key to accept the 1.00 ppm standard and press the STIRRER key to turn thestirrer off. 1. pH 4.01 buffer, color coded pink 910104 2. Ammonia standard, 100 ppm ammonia as N standard 951207 10. Rinse electrode and stirrer thoroughly with deionized water. Gently remove excess solution from theouter sleeve of the electrode. 3. Ammonia standard, 1000 ppm ammonia as N standard 951007 3. pH adjusting ISA for ammonia electrode 951211 11. Place the probe and stirrer into the beaker with the 10.0 ppm standard such that the electrode tip isfully immersed in the solution. The stirrer should be positioned slightly below the tip of the electrode.Press the STIRRER key on the meter to turn the stirrer on. 4. Internal filling solution for ammonia electrode 951202 5. Replacement membranes, 20 loose 951204 12. Wait for stable reading (1-2 minutes). Enter standard value of “10.0”using UP and DOWN arrowkeys and the DECIMAL/DIGIT key. 6. Deionized water 13. Press the MEASURE key to accept the 10.0 ppm standard and to move to the measure mode of themeter. Press the STIRRER key to turn the stirrer off. Calibration Standard Preparation 1. Prepare a 10 ppm standard by pipetting 10 mL of the 100 ppm ammonia standard into a 100 mL 14. Rinse electrode and stirrer thoroughly with deionized water. Gently remove excess solution from theouter sleeve of the electrode by dabbing with a clean paper tissue. volumetric flask. Dilute to the mark with deionized or deionized water. Mix well. 2.Prepare a 1 ppm ammonia standard by pipetting 10 mL of the 10 ppm ammonia standard into a 100mL volumetric flask. Dilute to the mark with deionized or deionized water. Mix well. 15. Place the probe and stirrer in a prepared sample such that the electrode tip is fully immersed in thesolution. Press the MEASURE key on the meter; the stirrer will turn on. The ISE: mg/L icon willflash as the measurement is being made. The ISE:mg/L icon will become solid and the display valuewill freeze when a stable reading is achieved. This value is logged and printed automatically and thestirrer turns off automatically. 3.Prepare a 0.1 ppm ammonia standard by pipetting 10 mL of the 1 ppm ammonia standard into a 100mL volumetric flask. Dilute to the mark with deionized water. Mix well. 16. Repeat steps 14 and 15 for additional samples. 4. Transfer 100 mL of the 10 ppm ammonia standard into a beaker. Just prior to the calibration reading,add 2 mL of the pH adjusting Ammonia reagent. In all analytical procedures, pH-adjusting ISA mustbe added to all standards and samples immediately before measurement. After addition of the ISA allsolutions should fall within a pH 11 -14 range (In this range the solutions are blue). 5.Transfer 100 mL of the 1 ppm ammonia standard into a beaker. Just prior to the calibration reading, add 2 mL of the pH adjusting Ammonia reagent 6. Transfer 100 mL of the 0.1 ppm ammonia standard into a beaker. Just prior to the calibration reading, add 2 mL of the pH adjusting Ammonia reagent. ( Water Analysis Instruments 1 66 Cummings C enterBeverly, MA 01915 USAM-1001-103/05 ieYi 248061-0 0 1 ) Tel:1-978-232-6000Dom. Fax: 1-978-232-6015IntlFax:978-232-6031www.thermo.com/waterO 2005 Thermo Electron Corporation IS O9001:2000 All rights reserved Ammonia inDrinking Water Sample Preparation 1.Using a graduated cylinder, measure 100 mL of the sample into a beaker. Just prior to the measurement,add 2 mL ofthe pH adjusting Ammonia reagent. 2. Repeat for additional measurements. Results Five aliquots of drinking water were collected from a faucet and measured for ammonia. The data demonstratea low ammonia concentration in drinking water, less 0.10 ppm. Drinking Water ppm Ammonia Sample#1: .<0.10 Sample #2: <0.10Sample #3: <0.10Sample # 4: <0.10Sample # 5: <0.10 %CV: Mean: 0.000Standard Deviation: 0.0000.000 Electrode Storage Between measurements, keep the electrode tip immersed in 10 ppm ammonia standard with added ISA. Forovernight or weeklong storage, the electrode tip should be immersed in 1000 ppm ammonia standard withoutadded ISAFor storage over one week disassemble electrode completely and rinse the inner body, out body, and bottom cap with deionized water. Dry and reassemble electrode without filling solution or membrane. Equipment Setup Electrode Setup-Ammonia Electrode NOTE: Soak inner body in electrode filling solution for at least two hours before assembling electrode. For best results, soakinner body overnight. 1. While holding the probe vertically, unscrew the top cap (a) and carefully remove the glass electrode innerbody (b) from the electrode outer body (c) (See Fig. 1). Set cap with inner body aside carefully. Pour outremaining electrode filling solution from outer body if applicable, new probe will not have any fillingsolution in the body. 2 Unscrew membrane cap (d) from outer body (See Fig. 2). Remove old membrane, if applicable. .3 Wearing gloves, use tweezers to carefully grasp corner of white membrane from between paper separators(See Fig. 3). Do not to touch center of membrane. 41 With free hand, grasp electrode outer body with threads oriented to the top. Align straight edge ofmembrane against threaded shoulder and hold with thumb (See Fig. 4). With other hand, gently stretchthe membrane upwards (See Fig. 5), then across the opening (See Fig. 6), then down to align other edgewith the opposite shoulder (See Fig. 7). While holding each edge on both sides, gently stretch each serrated side of the membrane out and down over threads making sure that membrane surface is smooth andwithout wrinkles (See Fig. 8). Smooth any loose material taking care not to touch center of membrane (SeeFig. 9) NOTE: Do not overstretch the membrane. The membrane is considered overstretched ifthe black body material can be seenthrough the membrane. Discard membrane ifoverstretched and replace with new membrane. Continue from Step 3. 5. Replace membrane cap being careful not to touch membrane center (See Fig. 10). Screw down half wayand tuck any loose membrane material under cap while twisting.Make sure cap is fully screwed on. 6. Fill the outer body with 2.5 mL filling solution, or approximately 50 drops from the bottle (See Fig. 11). 7. Place inner body into outer body containing filling solution and screw on upper cap (See Fig.12). 8. Carefully shake fully assembled electrode as if it were a clinical thermometer to remove bubbles. Gentlypull spring loaded cable back and slowly release to allow filling solution to migrate between membrane andglass electrode inner body (See Fig.13). 9. Rinse the electrode well and wipe dry. Meter Setup-4 Star benchtop For initial meter setup please follow the steps in the Quick Start Guide which is attached to the meter itself.The Quick Start Guide also contains a layout of the meter keyboard for reference. Please note words in allcapitals such as POWER indicates a key on the meter, and words in quotations such as “Unit"indicates adisplay on the meter screen. 1.Connect the electrode to the meter. 2.1.Connect the stirrer to the meter. 3. Press the POWER key on the meter to turn meter on. 4 Note that the arrow on the left of the screen indicates the active line. If not the top line is not active, pressthe LINE SELECTION key to change the selected line to the top line. Then press the UP or DOWNarrow keys to change the measurement mode of the top line to ISE. 5P.ress the SETUP key to enter ISE Setup. Press the LINE SELECTION key to select the bottom line.Press UP or DOWN arrow keys to select“3”for “rES”. Press LINE SELECTION key to accept value. Press LINE SELECTION key to select middle line, and press DOWN arrow key to select “nLln". 7 Press the LINE SELECTION key to select the bottom line. Press UP or DOWN arrow keys to select“off”for“nLln". Press LINE SELECTION key to accept value. Press LINE SELECTION key to select middle line, and press DOWN arrow key to select "rAng". Press the LINE SELECTION key to select the bottom line. Press UP or DOWN arrow keys to select“HigH” for "rAng”. Press LINE SELECTION key to accept value. 10. Press LINE SELECTION key to select middle line, and press DOWN arrow key to select “Unit". 11. Press the LINE SELECTION key to select the bottom line. Press UP or DOWN arrow keys to select“mGL" for “Unit". Press LINE SELECTION key to accept value. 12. Press MEASURE key to return to measurement mode. 13. If all steps were followed correctly the meter display will show three digits in the top line and “ISE: mg/Lto the right of the top line. The meter and electrode are now ready for calibration. NOTE: The Orion Benchtop Stirrer must be turned on in General Instrument Setup before analysis, please see theQuickstart Guide for instructions. Environmental InstrumentsToll Free:-ww.thermo.com of of of
确定
还剩1页未读,是否继续阅读?

产品配置单

赛默飞中国实验室产品事业部为您提供《饮用水中营养盐检测方案 》,该方案主要用于饮用水中其他检测,参考标准--,《饮用水中营养盐检测方案 》用到的仪器有台式pH/ORP/ISE/溶解氧/电导率测量仪、Orion 4-Star台式(便携式)pH/离子浓度测量仪
推荐专场


相关方案
更多
该厂商其他方案
更多