


本文章详细介绍了废水中BOD的测定,包括校准液、水样的准备,校准和测量过程,以及电极和仪表的维护等内容。
方案详情

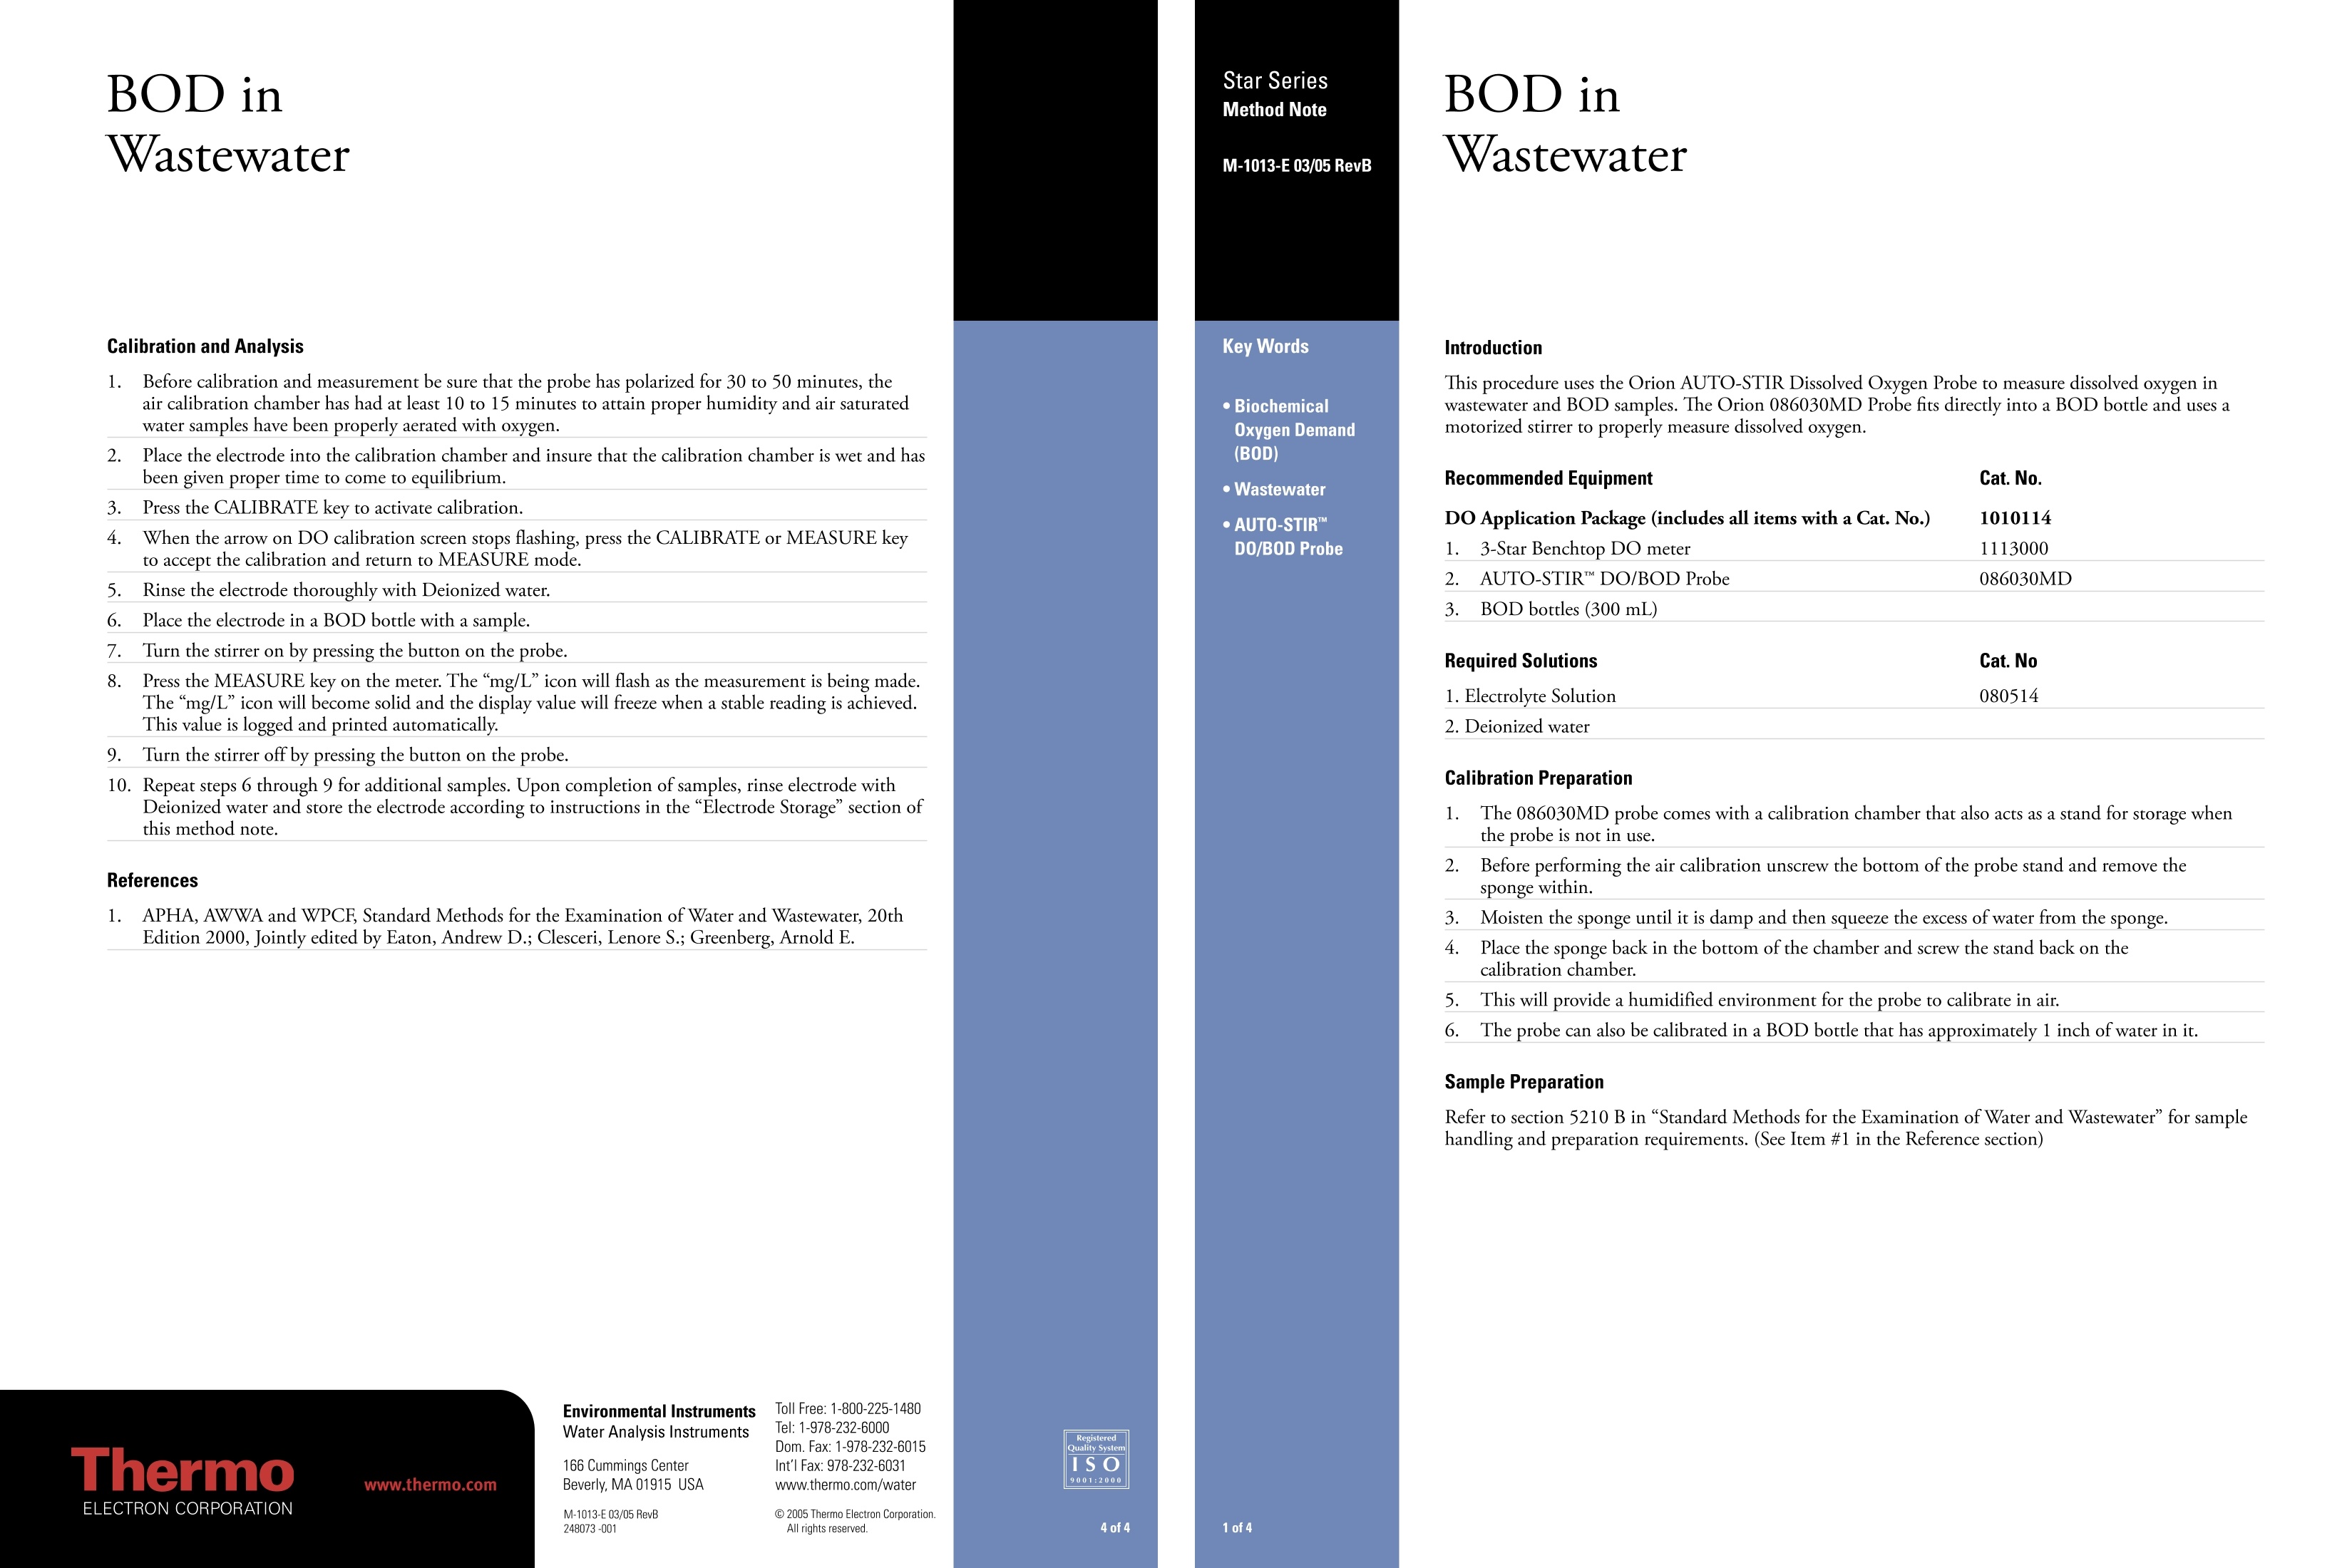
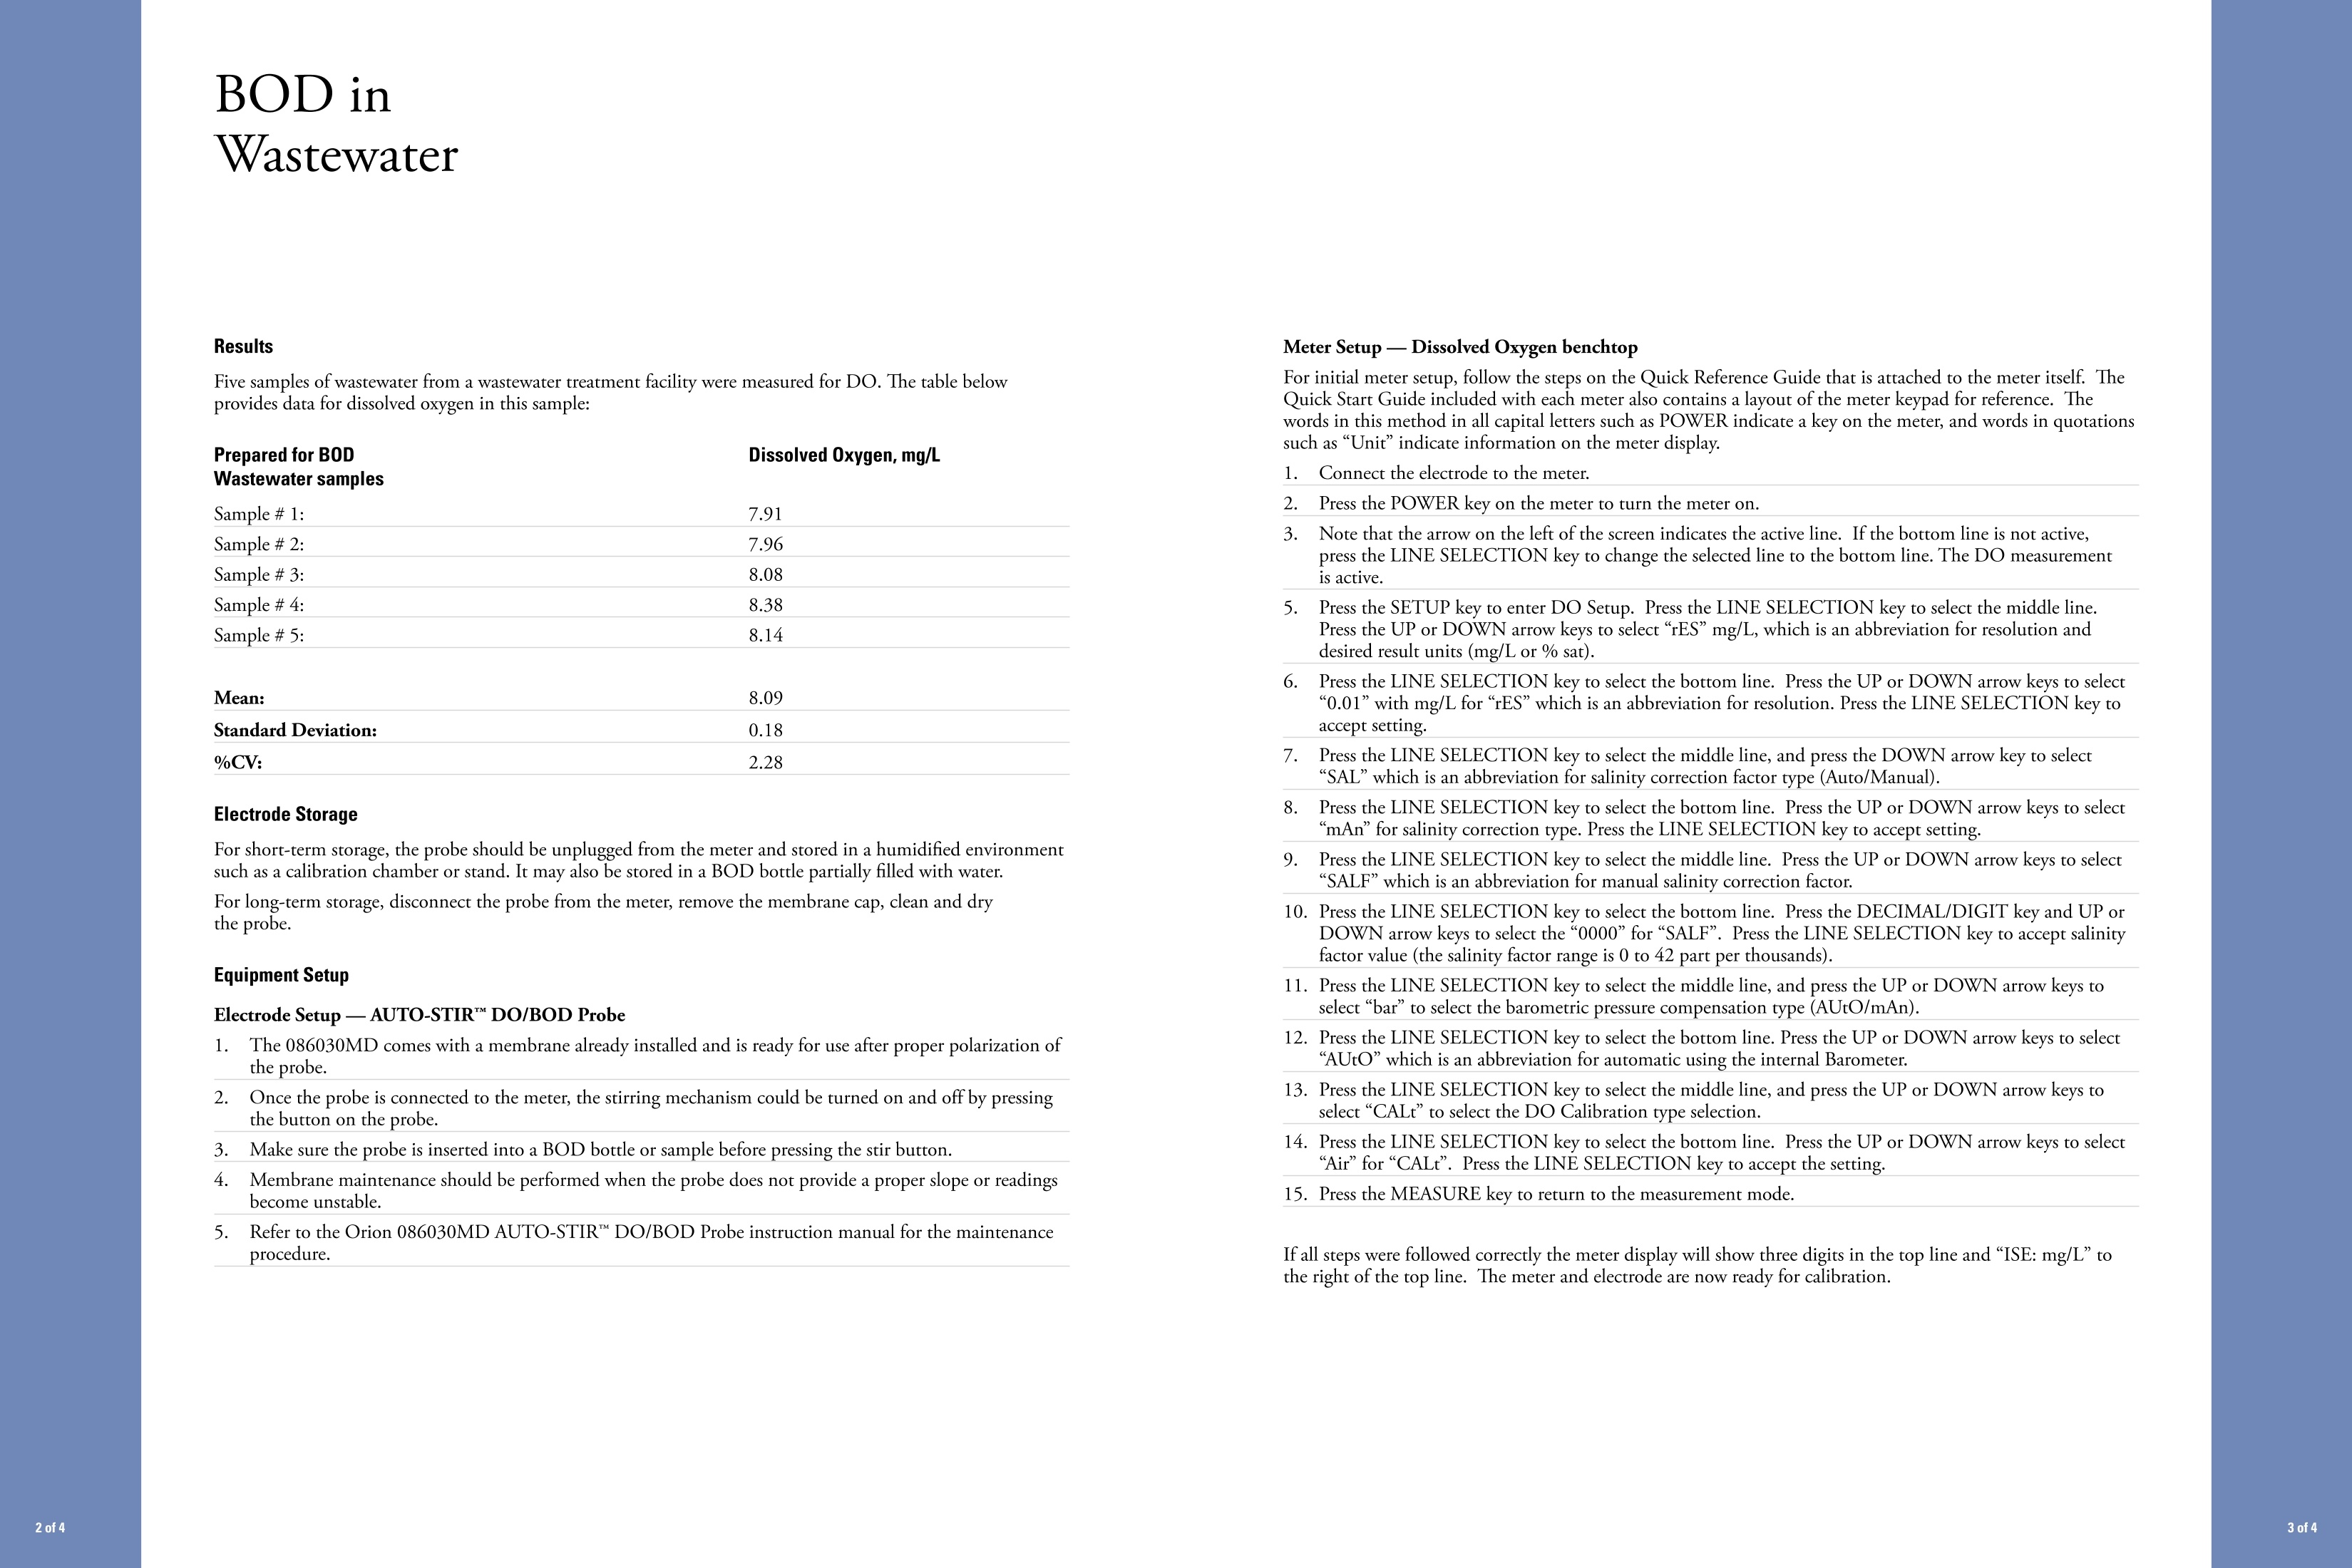
BOD inWastewaterBOD inWastewater BOD inWastewater Calibration and Analysis 1. Before calibration and measurement be sure that the probe has polarized for 30 to 50 minutes, theair calibration chamber has had at least 10 to 15 minutes to attain proper humidity and air saturatedwater samples have been properly aerated with oxygen. 3. Press the CALIBRATE key to activate calibration. 2. Place the electrode into the calibration chamber and insure that the calibration chamber is wet and hasbeen given proper time to come to equilibrium. 4.When the arrow on DO calibration screen stops flashing, press the CALIBRATE or MEASURE keyto accept the calibration and return to MEASURE mode. 5.Rinse the electrode thoroughly with Deionized water. 6.Place the electrode in a BOD bottle with a sample. 7. Turn the stirrer on by pressing the button on the probe. 8.Press the MEASURE key on the meter. The “mg/L”icon will flash as the measurement is being made.The“mg/L”icon will become solid and the display value will freeze when a stable reading is achieved.This value is logged and printed automatically. 9. Turn the stirrer off by pressing the button on the probe. 10. Repeat steps 6 through 9 for additional samples. Upon completion of samples, rinse electrode withDeionized water and store the electrode according to instructions in the “Electrode Storage"section ofthis method note. References 1. APHA,AWWA and WPCF, Standard Methods for the Examination of Water and Wastewater, 20thEdition 2000, Jointly edited by Eaton, Andrew D.; Clesceri, Lenore S.; Greenberg, Arnold E. Introduction This procedure uses the Orion AUTO-STIR Dissolved Oxygen Probe to measure dissolved oxygen inwastewater and BOD samples. The Orion 086030MD Probe fits directly into a BOD bottle and uses amotorized stirrer to properly measure dissolved oxygen. Recommended Equipment . Cat.No. DO Application Package (includes all items with a Cat. No.) 10101141. 3-Star Benchtop DO meter 1113000 2. AUTO-STIRDO/BOD Probe 086030MD 3. BOD bottles (300 mL) Required Solutions Cat.No 1. Electrolyte Solution 080514 2. Deionized water Calibration Preparation 1. The 086030MD probe comes with a calibration chamber that also acts as a stand for storage when the probe is not in use. 2.1Before performing the air calibration unscrew the bottom of the probe stand and remove the sponge within. 3. Moisten the sponge until it is damp and then squeeze the excess of water from the sponge. 4. Place the sponge back in the bottom of the chamber and screw the stand back on the calibration chamber. 5. This will provide a humidified environment for the probe to calibrate in air. 6. The probe can also becalibrated in a BOD bottle that has approximately 1 inch of water in it. Sample Preparation Refer to section 5210 B in “Standard Methods for the Examination of Water and Wastewaterfor sample handling and preparation requirements. (See Item #1 in the Reference section) Results Five samples of wastewater from a wastewater treatment facility were measured for DO. The table belowprovides data for dissolved oxygen in this sample: Prepared for BOD Dissolved Oxygen,mg/L Electrode Storage For short-term storage, the probe should be unplugged from the meter and stored in a humidified environmentsuch as a calibration chamber or stand. It may also be stored in a BOD bottle partially filled with water.For long-term storage, disconnect the probe from the meter, remove the membrane cap, clean and drythe probe. Equipment Setup Electrode Setup -AUTO-STIR"DO/BOD Probe 1. The 086030MD comes with a membrane already installed and is ready for use after proper polarization ofthe probe. 2.Once the probe is connected to the meter, the stirring mechanism could be turned on and off by pressingthe button on the probe. 3.Make sure the probe is inserted into a BOD bottle or sample before pressing the stir button. 4.Membrane maintenance should be performed when the probe does not provide a proper slope or readingsbecome unstable. 5. Refer to the Orion 086030MD AUTO-STIR"DO/BOD Probe instruction manual for the maintenanceprocedure. Meter Setup - Dissolved Oxygen benchtop For initial meter setup, follow the steps on the Quick Reference Guide that is attached to the meter itself. TheQuick Start Guide included with each meter also contains a layout of the meter keypad for reference. Thewords in this method in all capital letters such as POWER indicate a key on the meter, and words in quotationssuch as “Unit"indicate information on the meter display. 1. Connect the electrode to the meter 2 Press the POWER key on the meter to turn the meter on. 3.Note that the arrow on the left of the screen indicates the active line. If the bottom line is not active,press the LINE SELECTION key to change the selected line to the bottom line. The DO measurementis active. 5..Press the SETUP key to enter DO Setup. Press the LINE SELECTION key to select the middle line.Press the UP or DOWN arrow keys to select “rES”mg/L, which is an abbreviation for resolution anddesired result units (mg/L or % sat). 6.Press the LINE SELECTION key to select the bottom line. Press the UP or DOWN arrow keys to select“0.01”with mg/L for “rES” which is an abbreviation for resolution. Press the LINE SELECTION key toaccept setting. 7.Press the LINE SELECTION key to select the middle line, and press the DOWN arrow key to select“SAL”which is an abbreviation for salinity correction factor type (Auto/Manual). 8.Press the LINE SELECTION key to select the bottom line. Press the UP or DOWN arrow keys to select“mAn"for salinity correction type. Press the LINE SELECTION key to accept setting. 9.Press the LINE SELECTION key to select the middle line. Press the UP or DOWN arrow keys to select“SALF”which is an abbreviation for manual salinity correction factor. 10. Press the LINE SELECTION key to select the bottom line. Press the DECIMAL/DIGIT key and UP orDOWN arrow keys to select the“0000”for“SALF”. Press the LINE SELECTION key to accept salinityfactor value (the salinity factor range is 0 to 42 part per thousands). 11. Press the LINE SELECTION key to select the middle line, and press the UP or DOWN arrow keys toselect “bar"to select the barometric pressure compensation type (AUtO/mAn). 12. Press the LINE SELECTION key to select the bottom line. Press the UP or DOWN arrow keys to select“AUtO”which is an abbreviation for automatic using the internal Barometer. 13. Press the LINE SELECTION key to select the middle line, and press the UP or DOWN arrow keys toselect“CALt”to select the DO Calibration type selection. 14. Press the LINE SELECTION key to select the bottom line. Press the UP or DOWN arrow keys to select“Air"for“CALt”. Press the LINE SELECTION key to accept the setting. 15. Press the MEASURE key to return to the measurement mode. If all steps were followed correctly the meter display will show three digits in the top line and“ISE: mg/L"tothe right of the top line. The meter and electrode are now ready for calibration. www.thermo.com of of of of
确定
还剩1页未读,是否继续阅读?

赛默飞世尔环境与过程为您提供《废水中有机物综合指标检测方案 》,该方案主要用于废水中有机物综合指标检测,参考标准--,《废水中有机物综合指标检测方案 》用到的仪器有
相关方案
更多
该厂商其他方案
更多