


方案详情
文
本文章详细介绍了纯水中电导率的测定,包括校准液、水样的准备,校准和测量过程,以及电极和仪表的维护等内容。在线电导是实验室仪器。
方案详情

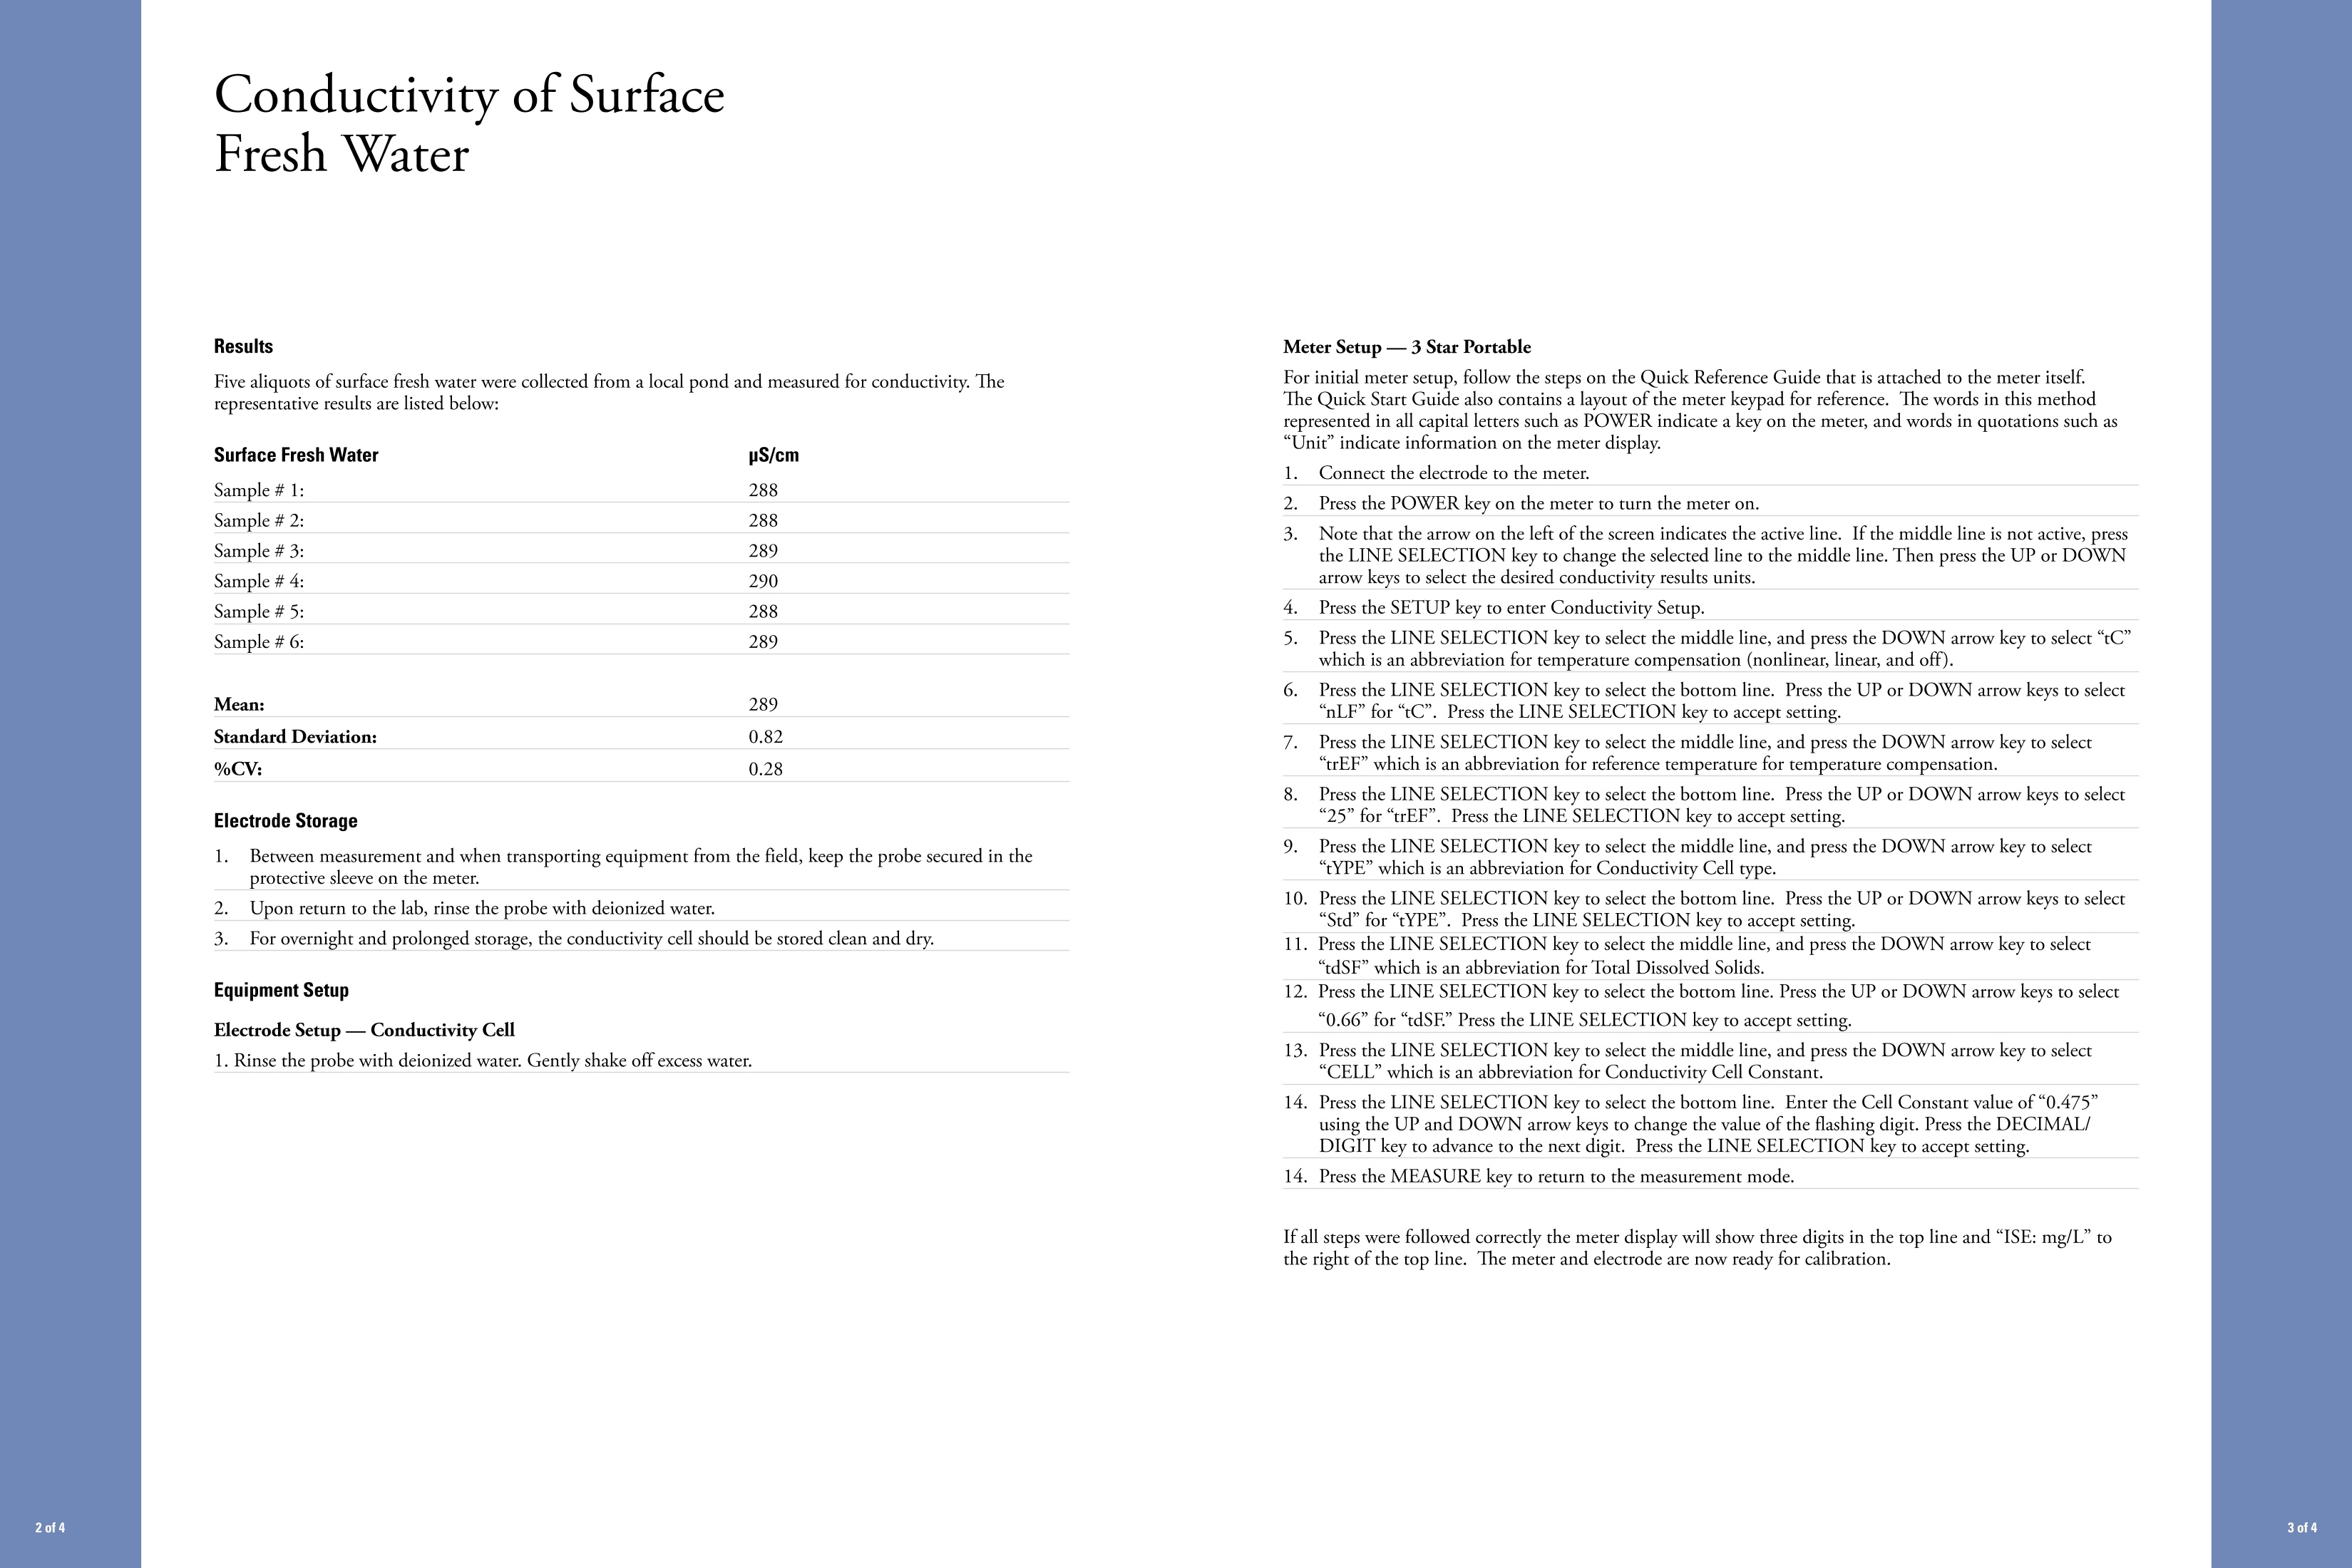
Conductivity of SurfaceFresh Water Calibration and Analysis Calibrate the cell constant with 1413 uS Conductivity Standard. 2. Rinse the probe with deionized water and gently shake off excess water. Thoroughly rinse cell in thefirst beaker with 1413 pS Conductivity Standard. Place the probe into second beaker filled with thisconductivity standard. Cell should be immersed a minimum of two inches in the solution. 3. Press the CALIBRATE key. 4.Enter the standard value of“1413”using the UP and DOWN arrow keys and theDECIMAL/DIGIT key. 5.Press the MEASUREMENT key to accept 1413 uS standard and to move to the measure mode ofthe meter. 6.Rinse the probe with deionized water and gently shake off excess water. Thoroughly rinse cell with oneor more portions of sample. /P.lace cell in a prepared sample such that it is immersed a minimum of two inches in the solution. 8.Press the MEASURE key on the meter, the uS/cm icon will flash as the measurement is being made.The uS/cm icon will become solid and the display value will freeze when a stable reading is achieved.This value is logged and printed automatically. 9.Repeat steps 7 and 8 for additional samples. Upon completion of samples, rinse electrode withdeionized water and store the electrode according to instructions in the Electrode Storage section ofthis method note. Conductivity of SurfaceFresh Water Introduction This procedure provides the direct conductivity reading of surface fresh water. The advanced Orion Dura-Probe" 4-electrode cell technology and the meter’s enhanced features make this method an ideal choice forlab or field measurements. Recommended Equipment Cat. No. Cond Application Package (includes all items with a Cat. No.) 1010122 1. 3-Star portable conductivity meter 1214000 2. Conductivity cell 013010MD 3. Electrode storage sleeve 1210003 4. Field case 1210004 5. Beakers (100 mL) Required Solutions Cat. No 1. Conductivity Standard, 1413 pS/cm 011007 2. Conductivity Standard, 12.9 mS/cm 011006 3. Deionized water Calibration Standard Preparation 1. Prepare two beakers with 1413 uS Conductivity Standard. Transfer approximately 55-60 mL of the 1413 uS standard into each beaker. The solution in first beaker will be used to rinse the probe before calibration. The second beaker will be used for calibration. 2. I1f the expected results are higher levels of conductivity, follow Step 1 with the 12.9 mS/cm Conductivity Standard. 3.I1f measuring a range of sample conductivities, then a two point calibration can be performed with thetwo standards. Sample Preparation 1.Transfer approximately 55-60 mL sample into a beaker. 2. Repeat this procedure for additional measurements. Conductivity of SurfaceFresh Water Results Five aliquots of surface fresh water were collected from a local pond and measured for conductivity. Therepresentative results are listed below: Su r f a c e F r e s h W a t e r pS/cm Sample #1: 288 Sample # 2: 288 Sample #4: Sample #3: 289290 Sample#5: 288 Sample #6: 289 Mean: 289 Standard Deviation: 0.82 %CV: 0.28 Electrode Storage 1. Between measurement and when transporting equipment from the field, keep the probe secured in theprotective sleeve on the meter. 2. Up1on return to the lab, rinse the probe with deionized water. 3. For overnight and prolonged storage, the conductivity cell should be stored clean and dry. Equipment Setup Electrode Setup - Conductivity Cell 1. Rinse the probe with deionized water. Gently shake off excess water. For initial meter setup, follow the steps on the Quick Reference Guide that is attached to the meter itself.The Quick Start Guide also contains a layout of the meter keypad for reference. The words in this methodrepresented in all capital letters such as POWER indicate a key on the meter, and words in quotations such as“Unitindicate information on the meter display. Connect the electrode to the meter. 2.Press the POWER key on the meter to turn the meter on. 3.Note that the arrow on the left of the screen indicates the active line. If the middle line is not active, pressthe LINE SELECTION key to change the selected line to the middle line. Then press the UP or DOWNarrow keys to select the desired conductivity results units. Press the SETUP key to enter Conductivity Setup. 5.1Press the LINE SELECTION key to select the middle line, and press the DOWN arrow key to select“tC”which is an abbreviation for temperature compensation (nonlinear, linear, and off). 6.Press the LINE SELECTION key to select the bottom line. Press the UP or DOWN arrow keys to select“nLF” for “tC”. Press the LINE SELECTION key to accept setting. 7.Press the LINE SELECTION key to select the middle line, and press the DOWN arrow key to select“trEF”which is an abbreviation for reference temperature for temperature compensation. 8.Press the LINE SELECTION key to select the bottom line. Press the UP or DOWN arrow keys to select“25”for “trEF". Press the LINE SELECTION key to accept setting. 9...Press the LINE SELECTION key to select the middle line, and press the DOWN arrow key to select“tYPE” which is an abbreviation for Conductivity Cell type. 10. Press the LINE SELECTION key to select the bottom line. Press the UP or DOWN arrow keys to select“Std”for“tYPE”. Press the LINE SELECTION key to accept setting. 11. Press the LINE SELECTION key to select the middle line, and press the DOWN arrow key to select“tdSF”which is an abbreviation for Total Dissolved Solids. 12. Press the LINE SELECTION key to select the bottom line. Press the UP or DOWN arrow keys to select“0.66”for “tdSF" Press the LINE SELECTION key to accept setting. 13. Press the LINE SELECTION key to select the middle line, and press the DOWN arrow key to select“CELL”which is an abbreviation for Conductivity Cell Constant. 14. Press the LINE SELECTION key to select the bottom line. Enter the Cell Constant value of“0.475”using the UP and DOWN arrow keys to change the value of the flashing digit. Press the DECIMAL/DIGIT key to advance to the next digit. Press the LINE SELECTION key to accept setting. 14. Press the MEASURE key to return to the measurement mode. If all steps were followed correctly the meter display will show three digits in the top line and "ISE: mg/L”tothe right of the top line. The meter and electrode are now ready for calibration. www.thermo.com of of of of
确定

还剩1页未读,是否继续阅读?

西安凯峰仪器仪表有限公司为您提供《饮用水中有机物综合指标检测方案 》,该方案主要用于饮用水中感官性状和物理指标检测,参考标准--,《饮用水中有机物综合指标检测方案 》用到的仪器有