


方案详情
文
本文章详细介绍了饮用水中氰离子的测定,包括校准液、水样的准备,校准和测量过程,以及电极和仪表的维护等内容。
方案详情

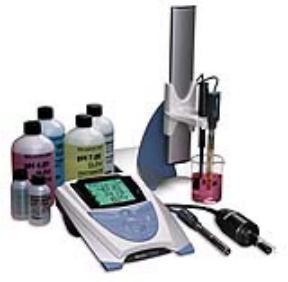
Cyanide inDrinking Water Cyanide inDrinking Water Calibration and Analysis 1. Allow all the standards and the samples to attain room temperature for precise measurements since themeasurement is temperature sensitive. 2. Place the electrode and stirrer into the beaker containing deionized water and alkaline reagentprepared in step 3 of the Calibration Standard Preparation. The electrode tip must be fully immersedin the solution. The stirrer should be positioned slightly below the tip of the electrode. Press theSTIRRER key on the meter to turn the stirrer on. Press the CALIBRATE key. 3.Wait for a stable reading (1-2 minutes). Add 0.1 mL of the 10 mg/L standard. Refer to step 4 of theCalibration Standard Preparation. 4.Wait for a stable reading (1-2 minutes). Enter the standard value of“0.01” using UP and DOWNarrow keys and the DECIMAL/DIGIT key. 5. Press the CALIBRATE key to accept the 0.01 mg/L standard. 6.Add 0.4 mL of the 10 mg/L standard. 7.Wait for a stable reading (1-2 minutes). Enter the standard value of“0.05"using UP and DOWNarrow keys and the DECIMAL/DIGIT key. 8P.ress the CALIBRATE key to accept the 0.05 mg/L standard. 9. Add 0.8 mL of the 10 mg/L standard. 10. Wait for a stable reading (1-2minutes). Enter the standard value of“0.13”using UP and DOWNarrow keys and the DECIMAL/DIGIT key. 11. Press the CALIBRATE key to accept the 0.13 mg/L standard. 12. Add 2.0 mL of the 10 mg/L standard. 13. Wait for a stable reading (1-2 minutes). Enter the standard value of“0.32” using UP and DOWNarrow keys and the DECIMAL/DIGIT key. 14. Press the MEASURE key to accept the 0.32 mg/L standard and to move to the measure mode of themeter. Press the STIRRER key to turn the stirrer off. 15. Rinse electrode and stirrer thoroughly with deionized water. Gently remove excess solution from theouter sleeve of the electrode by dabbing with a clean paper tissue. Do not wipe or rub the sensingelement of the electrode. 16. Place the probe and stirrer in a prepared sample with the electrode tip fully immersed in the solution.Press the MEASURE key on the meter; the stirrer will turn on. The ISE: mg/L icon will flash as themeasurement is being made. The ISE: mg/L icon will become solid and the display value will freezewhen a stable reading is achieved. This value is logged and printed automatically and the stirrer turnsoff automatically. 17. Repeat steps 15 and 16 for additional samples. Upon completion of samples, rinse electrode withdeionized water and store the electrode according to instructions in the Electrode Storage section ofthis method note. Cyanide inDrinking Water Introduction Cyanide can be present in various forms in water and is toxic as a free ion. This method provides adetermination of the free cyanide ion in drinking water using the ion selective cyanide electrode. The directmeasurement of ions using ion selective electrodes is a well-established technique frequently used as astandard method of analysis. This procedure eliminates interferences associated with the presence of colorand solids. Proper measures should be taken to ensue the safety of all laboratory personnel when handlingor properly disposing cyanide solutions. Recommended Equipment Cat.No. ISE Application Package (includes all items with a Cat. No.) 1010106 1. 4-Star benchtop pH/ISE meter 1115000 2. Orion ionplus° cyanide electrode 9606BNWP 3. Orion benchtop stirrer (or magnetic stir plate and bar) 096019 4. Benchtop electrode stand 1110001 150 mL beakers p.100 mL graduated cylinder 7. 0.1 mL to 1 mL adjustable volume and 2 mL pipettes 100 mL and 1000 mL volumetric flasks Required Solutions Cat. No. 1. Alkaline Reagent (Ionic Strength Adjuster) 95101i 2. Reference Filling Solution, Optimum Results""B 900062 3. Potassium Cyanide, reagent grade 4. Deionized water Calibration Standard Preparation 1. To prepare a 1000 mg/L cyanide stock standard place 2.50 g dry, reagent grade KCN in a 1000 mLvolumetric flask. Add 10 mL of alkaline reagent and 500 mL of distilled water to dissolve the solid.Add deionized water and bring the volume to the one liter mark. Mix well. Store stock standardsolution in a bottle and prepare fresh standard weekly. 2.Prepare a 10 mg/L cyanide standard by pipetting 1.0 mL of the 1000 mg/L cyanide standard into a100 mL volumetric flask. Dilute to the mark with deionized water. Mix well. 3.Using a graduated cylinder, measure 100 mL of deionized water into a 150 mL beaker. Add 1 mL ofalkaline reagent. 4 During calibration, add increments of the 10 mg/L standard to the beaker following steps outlined in the 4 2.0 mL 0.32 Sample Preparation 1. Using a graduated cylinder, measure 100 mL of the sample into a beaker. Add 1 mL of alkaline reagent. 2. RFepeat for additional measurements. Results Five aliquots of drinking water were than collected from a faucet and measured for cyanide. The datademonstrates that the cyanide concentration is less than 0.01 mg/L as expected for cyanide in drinking water(the EPA has set 0.2 mg/L as the maximum concentration of cyanide that can be present in drinking water). Electrode Storage For brief storage periods (up to one week), store electrode in deionized water. For storage periods longer thanone week, drain the electrode, flush the inside with deionized water and store dry with cap on to protect thesensing element. Equipment Setup Electrode Setup 1.Remove the rubber cap covering the electrode tip. 2. Fill the outer chamber with Optimum Results B filling solution. 3. Lift the filling solution bottle’s spout to a vertical position. 4 Insert the spout into the filling hole in the outer sleeve of the electrode and add a small amount offillingsolution to the chamber. Then tip the electrode to moisten the o-ring at the top and return electrode to avertical position. 5. Holding the electrode by the barrel with one hand, use the thumb to push down on the electrode cap,allowing a few drops of filling solution to drain wetting the inner cone. 6 Release the electrode cap allowing the electrode’s outer sleeve to return to its original position immediately,check to see if the o-ring is moist and repeat steps 4-6 until the outer sleeve has returned to its originalposition. Add more filling solution until the amount of filling solution within the electrode body is levelwith the bottom edge of the electrode filling hole. Meter Setup For initial meter setup, follow the steps on the Quick Reference Guide that is attached to the meter itself. TheQuick Start Guide included with each meter also contains a layout of the meter keypad for reference. Thewords in all capital letters such as POWER indicate a key on the meter, and words in quotations such as “Unit"indicate information on the meter display. 1. Connect the electrode to the meter. 2.Connect the stirrer to the meter. 3P.ress the POWER key on the meter to turn meter on. 4.Note that the arrow on the left of the screen indicates the active line. If the top line is not active, press theLINE SELECTION key to change the selected line to the top line. 5.Press the SETUP key. Use the UP or DOWN keys to enter ISE setup. Press the LINE SELECTIONkey to select the bottom line. Press the UP or DOWN arrow keys to select “3”for"rES". Press LINESELECTION key to accept setting. 6.Press the LINE SELECTION key to select middle line, and press DOWN arrow key to select “nL In”which is an abbreviation for non-linear blank correction. 7.Press the LINE SELECTION key to select the bottom line. Press UP or DOWN arrow keys to select“off’for“nL ln”. Press LINE SELECTION key to accept setting. 8.Press the LINE SELECTION key to select middle line, and press DOWN arrow key to select “rAngwhich is an abbreviation for measurement range. 9.Press the LINE SELECTION key to select the bottom line. Press UP or DOWN arrow keys to select"HigH" for "rAng”. Press LINE SELECTION key to accept setting. 10. Press the LINE SELECTION key to select middle line, and press DOWN arrow key to select “Unit”. 11. Press the LINE SELECTION key to select the bottom line. Press UP or DOWN arrow keys to select“mgL”for“Unit". Press LINE SELECTION key to accept setting. 12. Press the MEASURE key to return to measurement mode. If all steps were followed correctly the meter display will show three digits in the top line and“ISE: mg/L” tothe right of the top line. The meter and electrode are now ready for calibration. Note: The Orion Benchtop Stirrer must be turned on in General Instrument setup before analysis,please see the Quickstart guide for instructions. www.thermo.com of of of of
确定

还剩1页未读,是否继续阅读?

产品配置单

赛默飞中国实验室产品事业部为您提供《饮用水中无机阴离子检测方案 》,该方案主要用于饮用水中无机阴离子检测,参考标准--,《饮用水中无机阴离子检测方案 》用到的仪器有台式pH/ORP/ISE/溶解氧/电导率测量仪、Orion 4-Star台式(便携式)pH/离子浓度测量仪
推荐专场


相关方案
更多
该厂商其他方案
更多